Saturday, 17 November 2012

New line!

I think we all know by now that I am horrible at blogging. I just cant do it regularly. I have recently set up a Facebook page though,  I am VERY SLOWLY getting followers, so if you feel like making someones day, go here and 'like' me pleeease.

I will still be using this blog though, just as a place to link back to when I have something too big to say.

Today I received my shipment of zippers, Lots of colours and sizes. EXCITED!

Here is what I did with my first zip............ ( sorry for the blurry photos, no flash and daylight is in short supply right now)
 
I gathered my supplies, some funky fabric for the outer, bright Orange zip, sew on interfacing (light) and some vintage fabric for the liner.
 

Nextly, I cut two rectangles for the outer, two for the liner and four of the interfacing,


I sewed the interfacing onto the linings and outers...................


I made some zipper end covers by folding little pieces of fabric in half and tucking the ends under, then slotting the zipper in and pinning.


Added two little lines of stiching......
 
 
Made a zipper sandwich,
 
 
Pinned the linings and the outers to each other, then sewed (almost) all the way round
 
 
Made a big fabricy mess turning it out the right way but eventually...................................
 
 
Ta - Dah!!
 
 
It's not perfect (so am keeping it) but I learnt from it, I made another straight away with longer zip covers and only put interfacing on the outers. Its beautiful and will be in my shop soon along with many more if I can bear to part with them.
 

Tuesday, 24 July 2012

Best bunting for your bucks.

This week I have been making some bunting for a charity called SEND A COW


Bunting is such an easy way to quickly add some colour and fun to a party or any place that needs jazzing up a bit, I have scoured Etsy and here is my top ten, hope you like them too.


Of course other market places are available but seriously why bother else where?


Thursday, 7 June 2012

Marbling

Yes, I'm still alive.

The Sproggit and I had a go at marbling, I have to say that even though I only have a short post about it we really were quite obsessed about it and produced at least a hundred pieces of beautiful paper over a week or so trying different techniques. The example below was our first attempt. We watched plenty of tutorials on You Tube this one is our favourite, its quite long but the end result is pretty amazing.

Anyway, here is our first one, I had a kit which I bought years ago, I dont think it cost much, maybe ten pound. It came with water thickener and a few inks in a nice box. The only downside to paper marbling is that to get the best water you need to mix the solution the night before.

We didnt flick the ink into the water at first, we just let it drip in. We added more and more ink until the surface was pretty much covered.

 As you can see, the colours we got in our kit were full on but we later experimented with kids poster paint mixed with a bit of water to make it drippy. That worked well especially with the flicky method.
 Nextly we got a cocktail stick and had fun dragging the ink around. flower shapes are easily made by pulling the ink into the centre. This effect works best when you keep putting the ink inside the previous drip to form rings.
Here is our finished piece. Yes. this really is our first try. Now you can see why we ditched the camera and just got stuck in. Much fun was had.

Wednesday, 2 May 2012

Photo a day

Day twenty seven.......................


SOMEWHERE I 'WENT'


Day twenty eight.............

1 PM

Day twenty nine............

CIRCLE

day thirty.............


SOMETHING THAT MAKES ME SAD

(Missing my Grandads left and centre)

Saturday, 28 April 2012

Photo a day

Soooo far behind, but will catch up!

Day twenty five...................


LOOKING DOWN


BLACK AND WHITE

Tuesday, 24 April 2012

A little goes a long way

I have a fabulous customer who makes unique handbags and more, she is as crazy about wax print as I am and she recently sent me a picture of a her green boucle, while she had it wrapped around her shoulders she had a eureka moment, what could possibly make this snugly wrap better?

AFRICAN WAX PRINT OF COURSE!


I love how wax print is just as interesting on a small scale and I have a Grey wool blanket that needs some life injected into it so I think I may be stealing this idea.

Photo a day.

CATCH UUUUUUP!


Day twenty two............


THE LAST THING I BOUGHT

Day twenty three..................


VEGETABLE

Day twenty four.......


SOMETHING I AM GRATEFUL FOR

Saturday, 21 April 2012

Photo a day

Day twenty....................


SOMETHING I DREW

Okay, so I didn't draw it, but I did help colour it in.

Day twenty one............


BOTTLE

I picked these up at the local car boot for about 50p. no idea how old they are but they are very pretty and have wibbly glass.


I finally found the time to finish my one off hand painted cotton. but I seriously suck at photography and out of all the shots I did, this is really the only usable one. which is still rubbish. Will have to re-do them all before it makes it into my shop.


Thursday, 19 April 2012

Wednesday, 18 April 2012

Photo a day.

Okay, it would seem I am not a post a day kind of girl, so here is two days worth again!

Day seventeen..............


SOMETHING I DONT LIKE
(Latex gloves, eeeew)


Day eighteen...........

HAIR

Monday, 16 April 2012

Fabric printing

I have been working on different fabric printing techniques, I had a go at screen printing using home made screens, but I didn't like the way the ink had to be really solid just to get a print. Then I remembered when I worked at a T-shirt printing place a very long time ago, I was told that there is no variation in screen printing. You have good prints and bad prints. This is very true so I realised that I would probably never be happy with screen printing, I needed some thing that let you be more creative with the ink amount.

Stencils were the way forward. and any way, screens are just stencils...............on screens right?? 

So I have nearly finished my first yard. I have to say, I SERIOUSLY LOVE IT! I have been designing and cutting my own stencils, lots of angular stuff, but also some circular masks. Here is a little peek.


I love the way you can use the ink how you want, creating light and dark areas. My stencils are all temporary and will only be used for this piece so it will be absolutely one of a kind. I will post the finished fabric as soon as its finished.

Photo a day.

Day fifteen..............


SUNSET

(art work by my daughter)

Day sixteen...............


FLOWER


Saturday, 14 April 2012

Photo a day.

Day fourteen.................


HOW I FEEL TODAY.

I am missing my cat Ozzy, hope he is okay..............

Friday, 13 April 2012

Photo a day.

Day thirteen............

FRIDAY THE 13TH!


SOMETHING I FOUND

Found this after the munchkin had gone to bed. She is such a cheeseball.

Thursday, 12 April 2012

Photo a day.

Day twelve...............


STAIRS

I have to say, I am a little obsessed with Instagram. so I took a few more, I liked the 'grunginess' of the bridge that goes over the railway and the monster enjoyed going a bit crazy. Here is my favourite.


You can join in with photo a day at any time. here is the list to follow.

Wednesday, 11 April 2012

Photo a day.

Day eleven...........

The weather was good today, so much time was spent in the garden, Which means crafty stuff was saved for tomorrow when I am child free. Speaking of child...............


She was loving the sunshine and went all diva on me, I cut five inches off her hair and she spent the whole morning flicking it Miss Piggy style. Anyway, here is my contribution to photo a day April.


WHERE I ATE MY LUNCH

This seat is one of those bargains I just had to buy for a future project. It may take some time, I have owned it for nearly three years.

Monday, 9 April 2012

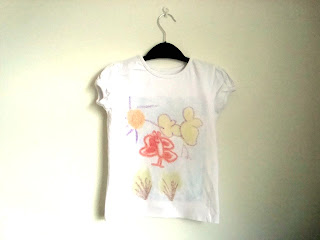
Wax crayon print.

Today we tried wax crayon printing, the munckin drew a design on some fairly fine sandpaper, I went over any bits that were not very bright.

We put some card inside an old white school T-shirt, placed the picture face down and put a scrap piece of fabric on top, we set the iron to cotton and moved it slowly over our picture. after a couple of sneek peeks to check it had transfered enough we removed the sandpaper, put the fabric back on and ironed for a bit longer. aparently this heat sets it but its then reccomended that it goes in the tumble dryer for twenty minutes. but I dont have one.


I am rubbish at photography so the print looks a bit pale but it actually came out much brighter than above. These T-shirts are two for three pound in supermarkets and the crayons and sandpaper we already had at home, so this was a great inexpensive craft and she cant wait to wear her creation tomorrow!